2.9.1-app-design
2.9 App Design
After the application is created, users can design the entire app, including forms, page layouts, charts, etc. The application includes a Desktop (PC) version, Mobile version, DEV, Homepage, Operation area, and left-side Navigation Menu Panel. "Desktop version" is specifically designed for displaying desktop data, including: Create Form, Create Page, Create View, Create Chart, Associated View, Mgt View, External Links, and Create Navigation Group. "Mobile" refers to designing the display style of mobile data, including: Create Page, Create View, Associated View, External Links, and Create Navigation Group. The main operations include exporting the application package, deleting data, and publishing the application.
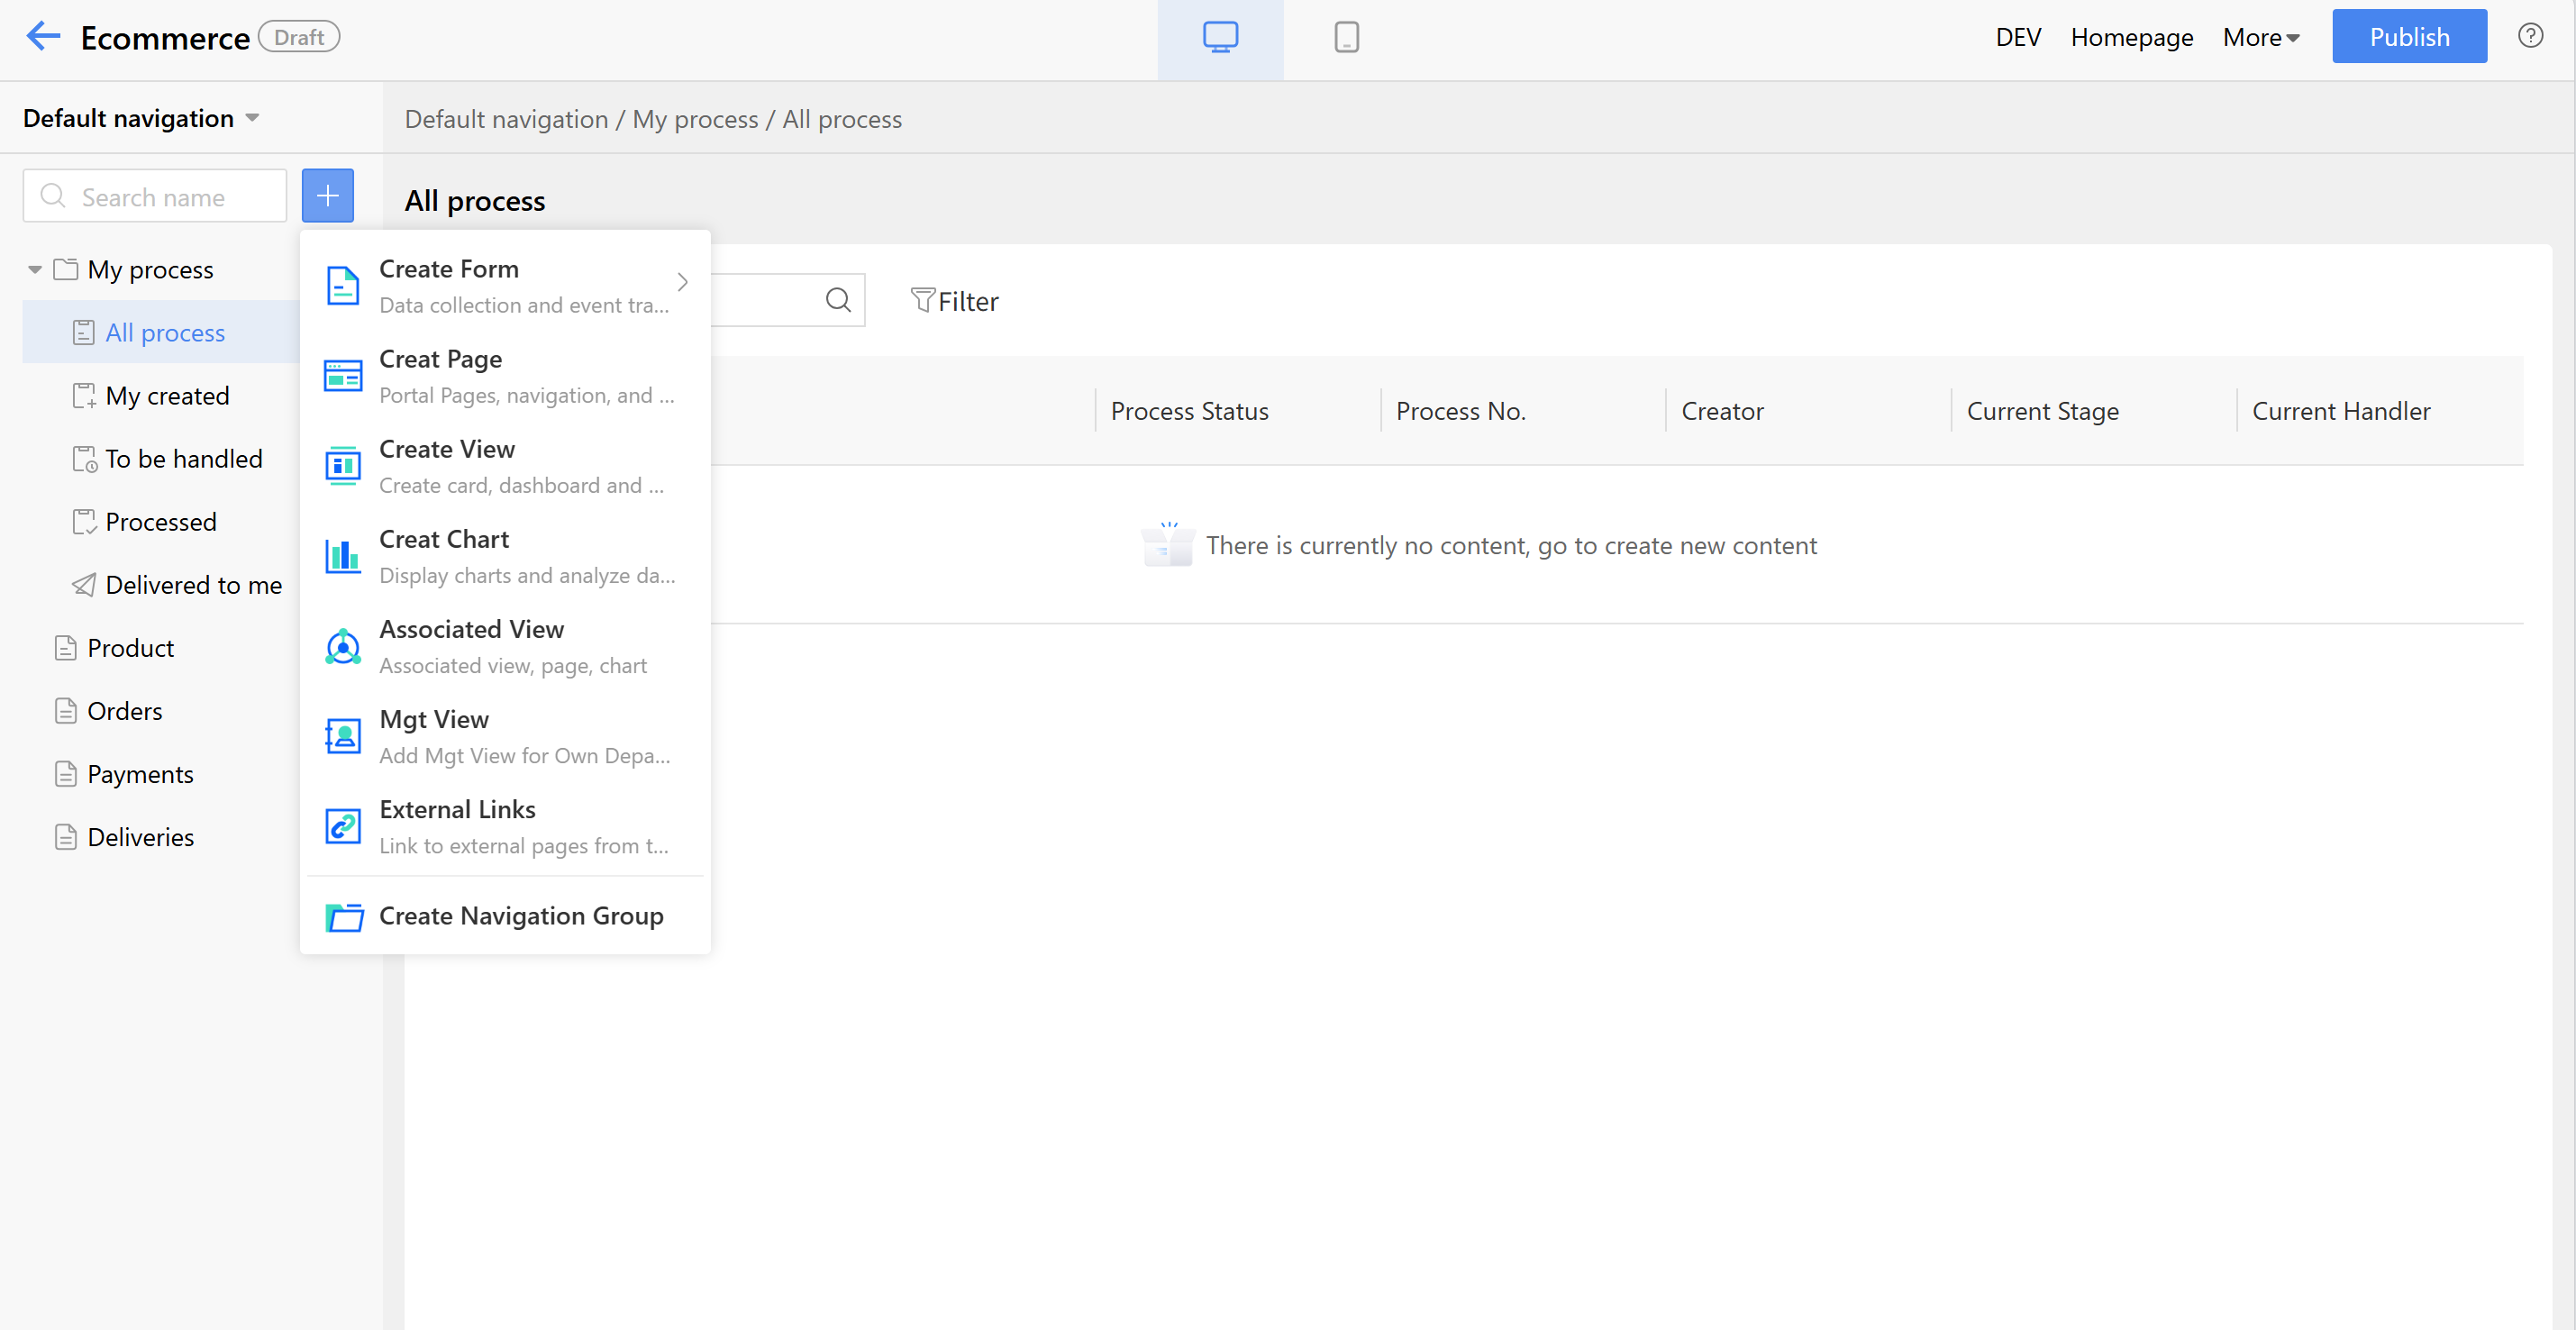
Figure: App Design Interface
2.9.1 App Design
The left menu navigation panel on app design page defaultly displays "My Processes", which includes: All processes, My Creation, To Do, Completed, and C.C. to Me. The "Category Template Model" and "Simple Category Model" will also show in "DEV". Users can switch between desktop (PC) and mobile views at the top of the app design page. The middle area displays the existing data of the application. Users can publish or delete application data in the upper right corner of operation area, where users can also enter the console and access the Homepage View of apps.
The application design page can be used to design and customize the data display methods of the apps running pages, charts, views, links, etc. The designed styles will be displayed in real time on the app design page, enabling quick comparison and adjustments.
When hovering the mouse over the default navigation, an option to copy the navigation will appear (supported on both PC and mobile devices). Users can create new navigation by copying the default navigation and configuring different departments, personnel, or organizations as authorized users based on business needs. Users with different roles will see only the navigation they have permission to access when entering the app homepage. If they have multiple navigation permissions, they can switch between them.
2.9.1.1 PC (Desktop) Version
Pages, views, charts, and other data created on the PC will only be displayed on the PC. By default, there will be "My Processes," which includes: All processes, My Creation, To Do, Completed, and C.C. to Me.
2.9.1.1.1 Create Regular Form
Steps to create a new form:
- Set the form name (names cannot be duplicated), form code, form icon, table name, etc. The form code and table name support auto-fill.
- To integrate with external system tables, users can enable the third-party data source, select the corresponding data source, and then associate the relevant form using "Relate existing tables".
- After completing the required fields, click "Confirm" to proceed to the form design page. For detailed information on form design, refer to Section 2.3.2 Form Design.
After publishing a form designed, return to the app design page to see the auto-generated menu. Click "Form Design" to navigate to the form design page.
2.9.1.1.1.1 App Design Configuration Instructions
Operating Instructions:
- List Display: Configure the fields to be displayed in the form header. Enabled fields will be displayed, while disabled fields will not.
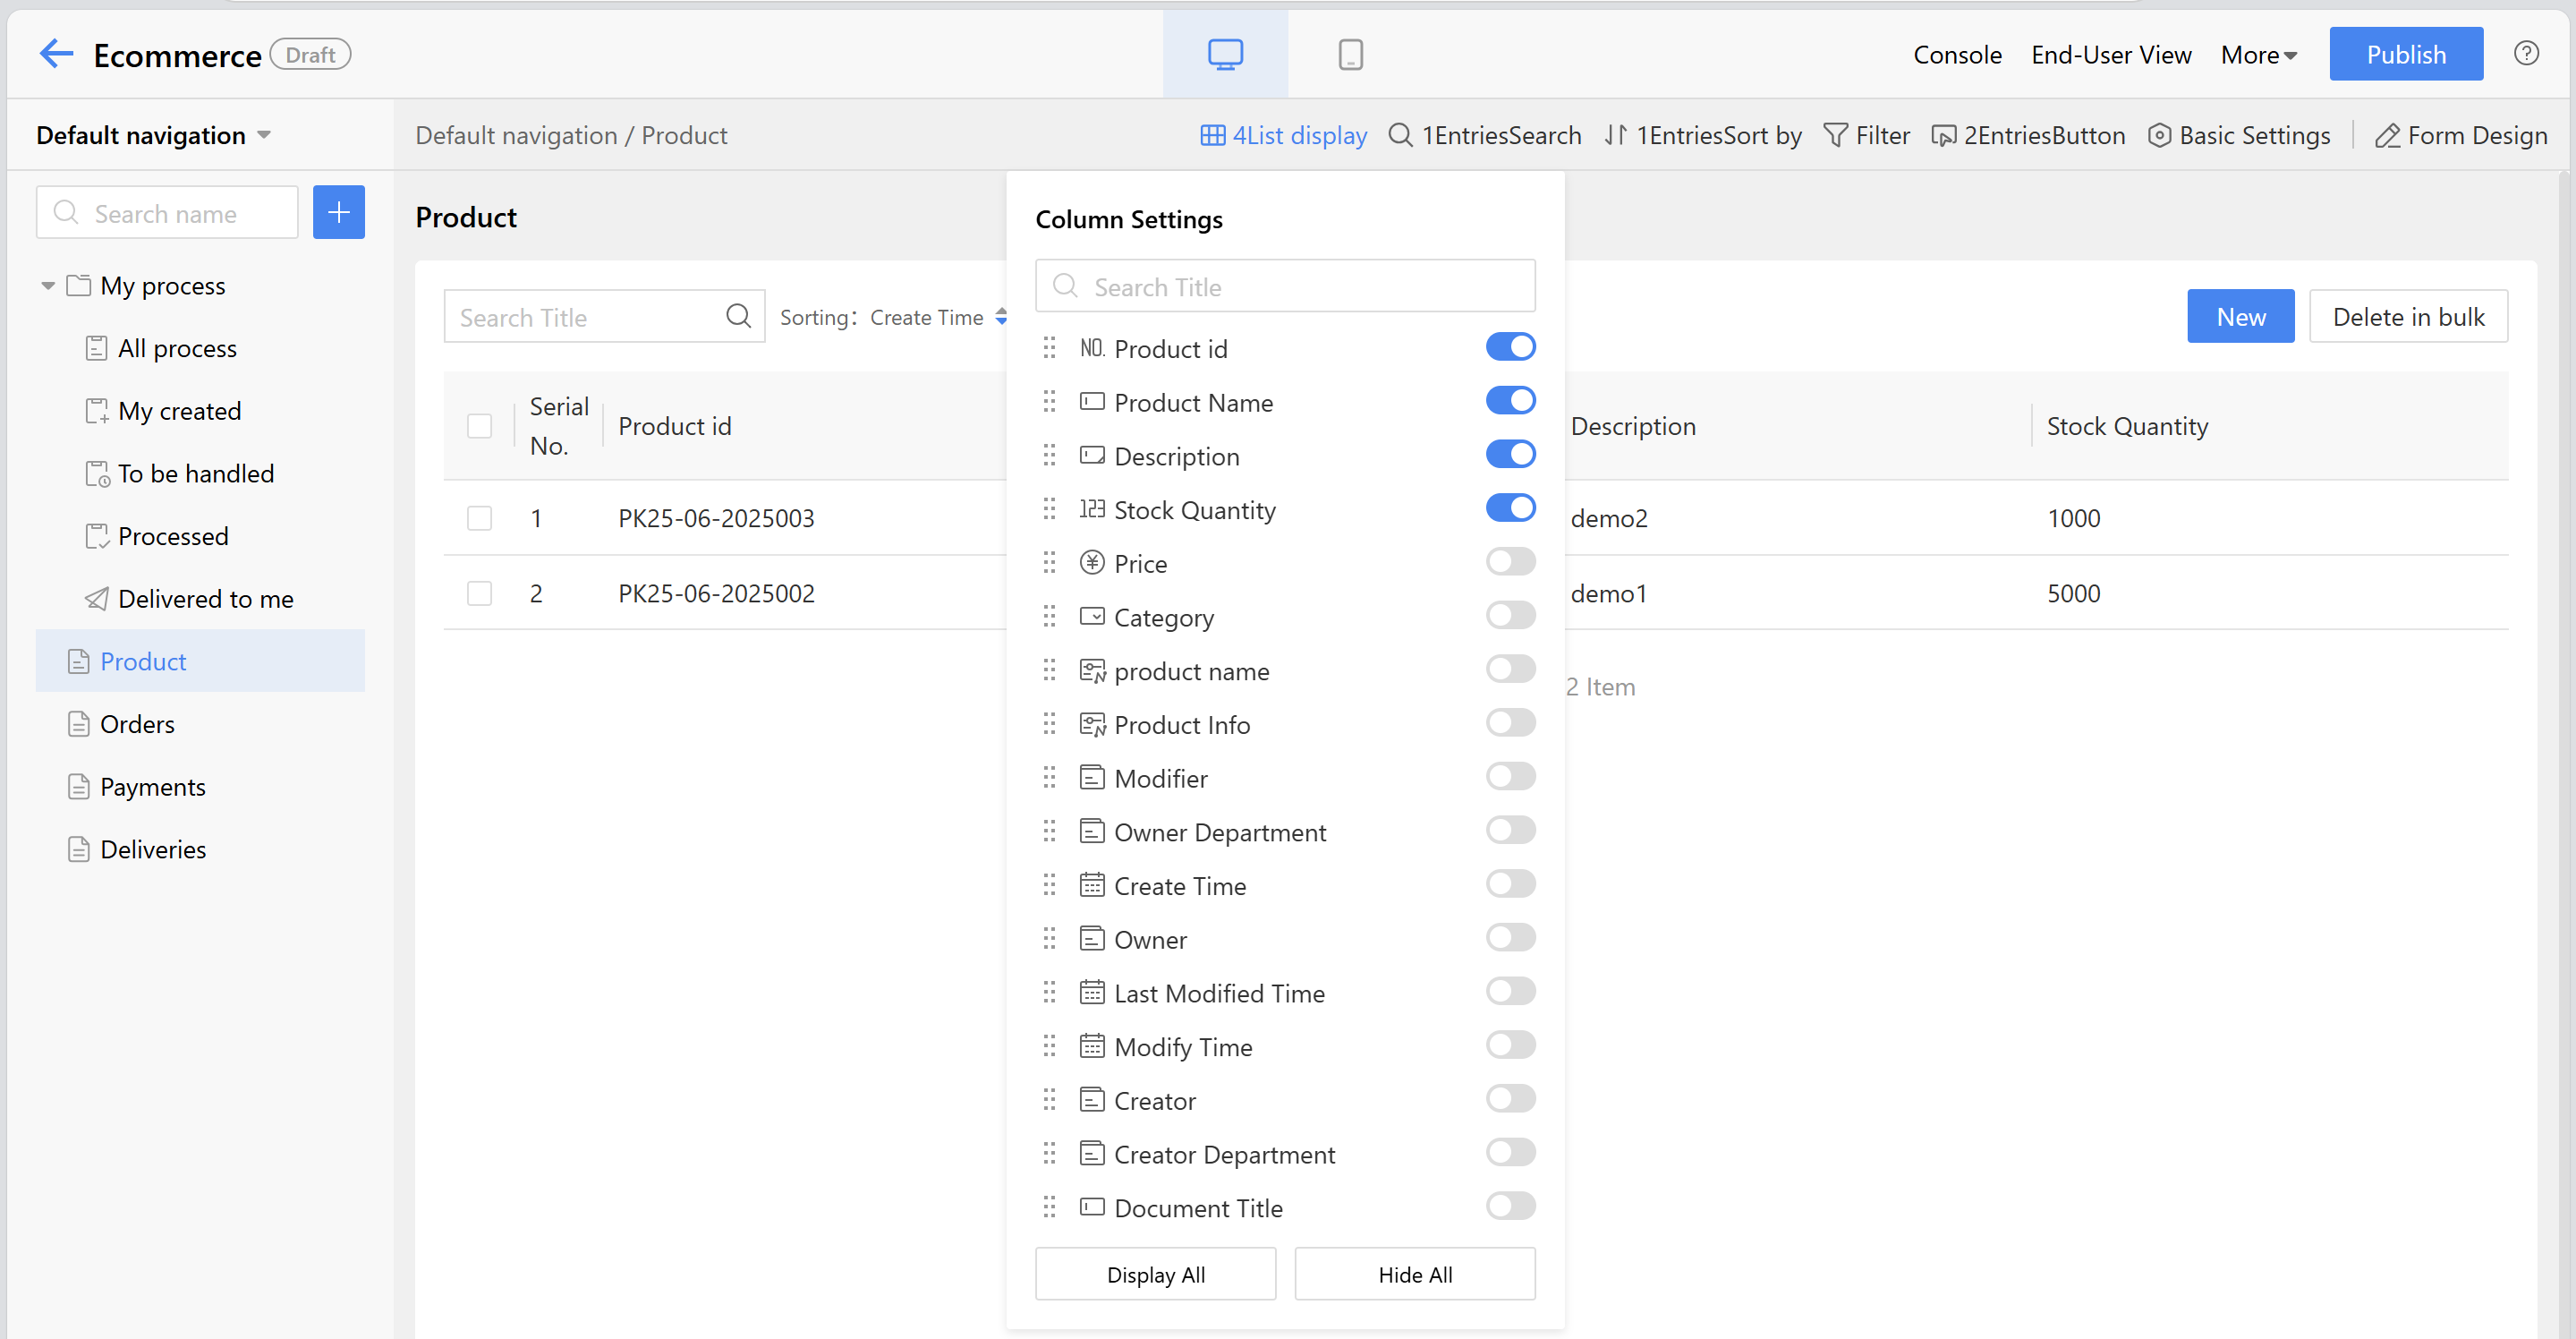
Figure: App Design Configuration Instructions
- Search: Configure the searchable range in the form header.
- Sort: Adjust the display order of fields in the list header by dragging them.
- Filter: Configure the conditions available for filtering in the form list header search.
- Button: Configurable operations available to users on the Homepage, such as create, delete, or add customized operations.
- Basic Settings:
- "Basic Info" displays the name and code of the current view. Users can open the view and modify the opening method to act on the End-user running.
- "Column width" sets spacing between header fields.
- "Statistics" are conducted on the current form fields or data, with options for weekly or scheduled statistics.
- "Data filtering" needs to display data that complies with the rules when running.
- "Paginator" automatically splits data into pages when excessive, offering three methods: simple paginator, complex paginator and scroll loading.
2.9.1.1.1.2 Import Form From Excel
Users can import existing Excel sheets (tables containing simple data, without merged cells or complex structures like enumerations) directly into the MK system to generate corresponding data table pages automatically. After importing, new fields can be added to the existing table.
- To access: On the app design page, click the "+" -> Create Form -> Import Form From Excel
- Instructions:
- Download Import Template file. Users can modify the data in the template.
- Currently supported widgets include single line text, multi-line text, date, numeric value, currency, directory picker, single selection, multiple selection, single-select dropdown, multi-select dropdown, and detail table.
- Directory picker and date widget need to follow the specifications provided in the template.
- Directory picker:
- For users: name, login, ID, name/login, No.
- For organizations/departments: ID, No., full department path + name.
- Date format: 2025-07-10, 2025/07/10, 2025-07-10 16:30, 2025/07/10 16:30
- Directory picker:
Steps:
- The import file supports importing process approval records and process templates. After successful import, the system generates approval records for the instance data.
- Data Preview. Preview Imported Data in the Template.
- Customize widget types, form names, and field codes.
- For failed attempts, the failed file will be displayed and can be downloaded to check the reasons.
2.9.1.1.2 Create Category Template Model
The category template model and simple category model are distinct from regular forms. Currently, they cannot be created directly from the app design page. Users need to access console from the app design page and add them under the form section. After an administrator creates and publishes a form, the navigation on the app design page will automatically generate two sections: one for the form list and another for the form template list under console. When running the form, users can create categories and form templates based on the template list, allowing them to initiate instance data from different templates.
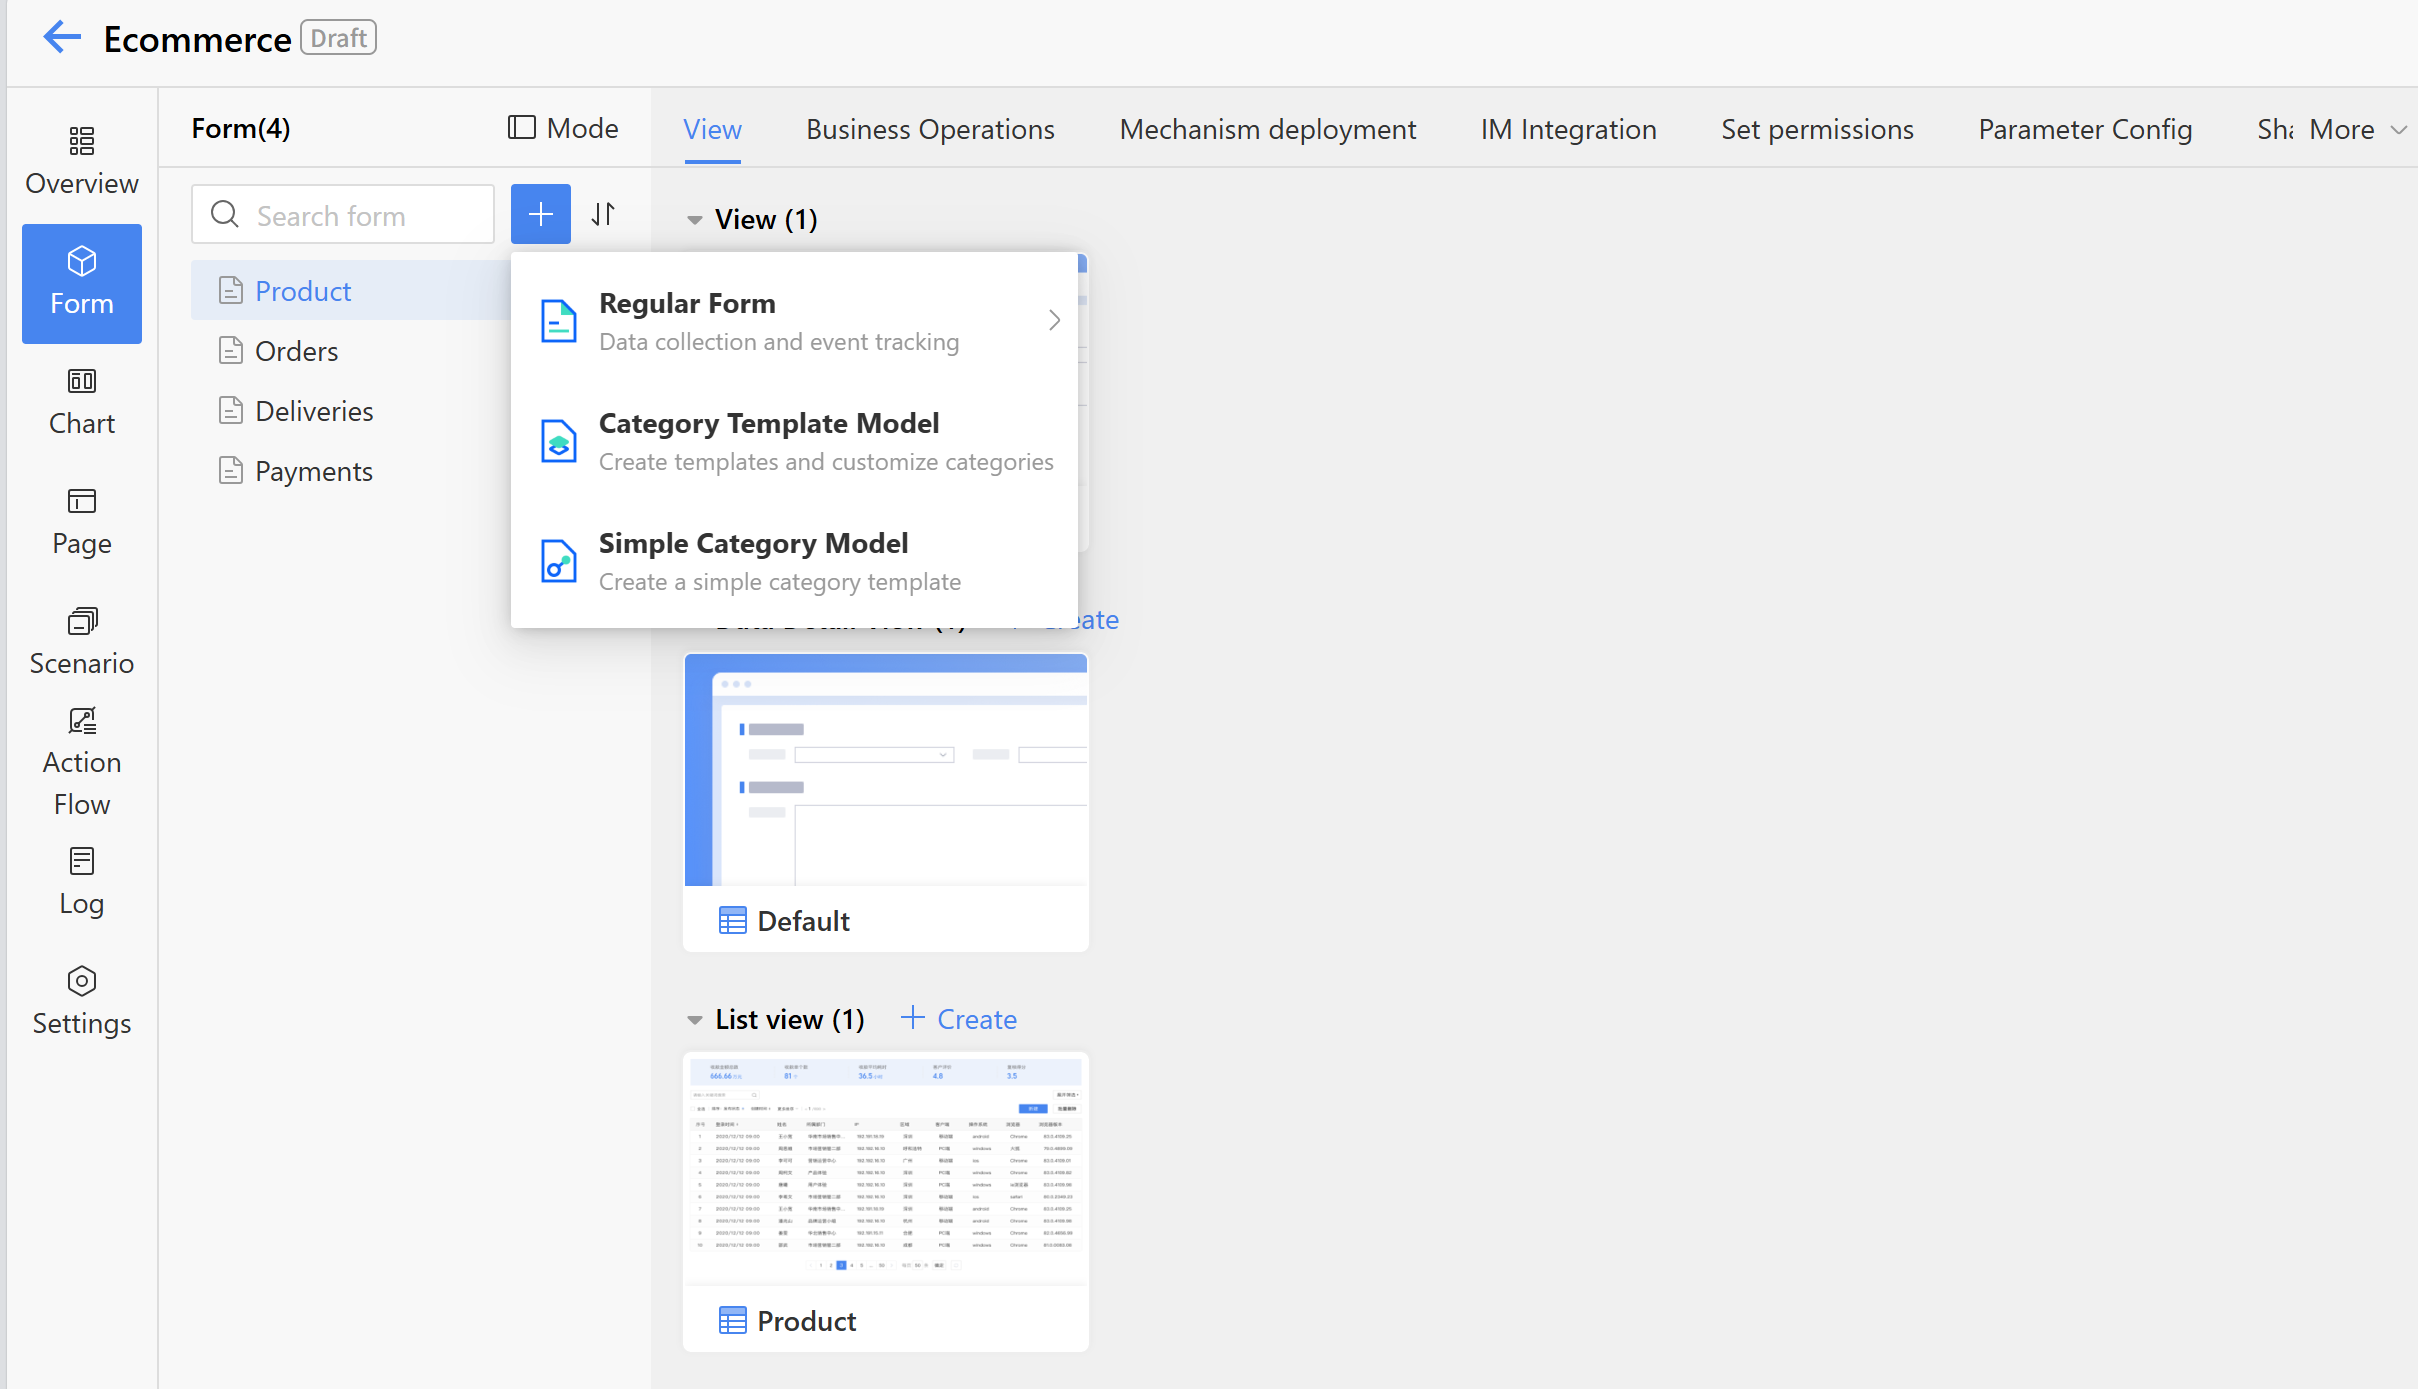
Figure: Create Category Template Model
Steps to Create Category Form:
- Set the form name (names must be unique), form code, form icon, category table name, template table name, main table name, etc. Form codes and table names support auto-fill.
- To integrate with external system tables, enable third-party data sources and select the appropriate data source.
- After completing the required fields, click "Confirm" to proceed to the form design page. For detailed information on form design, refer to Section 2.3.2 Form Design.
After creating and publishing a classified form through the app design page, return to the app design page to see the automatically generated navigation, which includes the template list under console. Click "Form Design" to jump to the form design page.
2.9.1.1.3 Create Page
Creating a new page will invoke the portal's page designer, then users will jump to the page design after the page is created. Newly created page data will be displayed in the left-hand menu on PC after saving. For more detailed information about "Pages," refer to "Portal Management Operation Manual" Chapter 5.
Page design offers both fixed and flexible layout options. The left-hand menu provides various components for users to choose from, enabling the creation of diverse and personalized pages. The default page name is "Untitled," which can be modified as needed.
After saving created pages, returning to the app design page, users can find automatically generated "Pages" menu. The menu name corresponds to the page name and can be modified as needed.
- Click "Page Setting" to modify the page name and visitor.
- Click "Page Design" to go to the page configuration settings.
- Click "Preview" to view the actual effect, thus users can modify in time.
2.9.1.1.4 Create View
A view is a window for users to view and manage table data, displaying target data in different formats according to user roles or scenarios.
- "View name" can be customize.
- "Form" can select from a published form.
- Available view types include table view, Gantt chart, card view, kanban view, and calendar view.
- The code supports auto-fill.
- After completing the fields, click "Confirm" to proceed to the view config details page. For configuration details of various views, refer to section 2.9.4 data list view. Currently, the category forms only support table view, card view, and kanban view.
After creating a new view through the app design page by entering a name and selecting a form, user will see an automatically generated "View" menu. The name matches the view name and can be modified as needed.
2.9.1.1.5 Create Chart
Users can create statistics charts on the app design page to perform analysis on data generated by the application, presenting the information through intuitive multi-dimensional charts.
2.9.1.1.5.1 Application Scenario
- In training management scenarios, trainers need to perform analysis of training status, instructor summaries, and trainee exam pass rates through charts.
- In HR management scenarios, HR specialists need to perform analysis of employee gender ratios and education distributions through charts.
- In customer management scenarios, customer managers need to perform analysis of opportunity distributions, customer distributions, and total contract amounts through charts.
2.9.1.1.5.2 Configuration Method
- Create Chart: On the app design page, click the "+" -> "Create Chart" to create a new chart, then go basic settings to modify the chart name, code, and the status.
For specific chart operation configurations, please refer to the "Chart Platform Operation Manual" section on chart design.
2.9.1.1.6 Associated View
An associated view is used to link existing views, charts, and page data.
- The name and data source of the associated view are required.
- Data sources can be selected from: views, charts, or page data.
After successfully creating an associated view through the app design page, users can see the automatically generated "Associated View" menu. The menu name matches the associated view's name and can be modified as needed.
2.9.1.1.7 Mgt View
Management views widget the usage scope and business operations by configuring data permissions. For the creation of data permissions, please refer to section 2.3.5.5.5 Data Permissions.
Users need to input the name, select the permission group and data source. The accessible scope is determined by the selected permission group. For example, if the R&D department is selected, only personnel under the R&D department can view the content in the management view when the app runs.
2.9.1.1.8 External Links
External links are used to connect to external pages. By using the specified external link, the corresponding content page can be displayed directly, meeting users' needs for diverse design options.
- The name and link address of the external link are required.
- Please ensure the link address is complete.
Once completed, the external link menu will be automatically generated, and the linked page will be displayed in the app design interface.
2.9.1.1.9 Create Navigation Group
The navigation group is primarily used to categorize and manage menu bar data such as views, pages, and charts, making it easier for users to distinguish between items and improve efficiency during use.
- When creating a navigation group, users must input name.
- The navigation method can be set to "Default expand" or "Default collapse".
- Existing menus can be dragged into a navigation group, or new data can be created directly via the "+" in the navigation group. Newly created data menus will be categorized under the navigation group.
2.9.1.2 Mobile
Data created on mobile devices will only be displayed on mobile. By default, "My Processes" will also be shown, including: All processes, My created, To be handled, Processed, and Copied to Me.
Note: If there is only one menu on the mobile version, the menu name will not be displayed at the bottom.
2.9.1.2.1 Create Page
When creating a new page, the portal's page designer will be invoked. After creating the new page, users will be redirected to the page design interface. After saving the newly created page data, a menu will be generated on the mobile.
The left menu in mobile page design offers various widgets for users to choose from, allowing them to create diverse and personalized mobile display pages. The default name for a mobile page is "Untitled," which can be modified as needed.
After designing and saving a new page in the mobile app design section, returning to the mobile app design page will display an automatically generated "Pages" menu. The menu name corresponds to the page name and can be modified as needed.
- Click "Page Config" to modify the page name and access permissions.
- Click "Page Design" to go to the page configuration interface.
- Clicking "Homepage" will jump users to the mobile interface, where can view the actual runtning effects for timely design adjustments.
2.9.1.2.2 Create View
The mobile view is the window for users to view and manage mobile form data. Based on different user roles or scenarios, target data is displayed in various mobile formats.
- "View name" on the mobile can be filled in as needed.
- The belonging "Form" can be selected from published forms.
- "View Type" include table view, card view, kanban view, and calendar view.
- The "Code" supports auto-fill.
- After completing the form and clicking "Confirm" it will jump to the view config details page. For configuration details of various views, refer to section 2.5.4 data list view.
After creating a new view in the mobile app design page by inputing a name and selecting a form, users can see an automatically generated "View" menu. The menu name matches the view's name and can be modified as needed.
2.9.1.2.3 Associated View
The associated view on mobile is also used to link existing views, charts, and page data.
- The name and data source of the mobile-associated view are required.
- The data source options include: view, chart and page data.
After successfully creating an associated view through the mobile app design page, users can see an automatically generated "Associated View" menu. The menu name matches the associated view's name and can be modified as needed.
2.9.1.2.4 External Links
External links on mobile devices are used to connect to external pages. By clicking the specified link, users can directly access the corresponding content page, meeting their diverse design needs for mobile interfaces.
- The name and link address of the external mobile link are required.
- Please ensure the full link address is provided.
After completion, the external link menu will be automatically generated, and the linked page will be displayed on the mobile app design page.
2.9.1.2.5 Create Navigation Group
The mobile navigation group is primarily used to categorize and manage menu bar data such as views, pages, and charts, making it easier for users to distinguish when using the mobile interface.
Created mobile menus can be dragged into the navigation group, or users can create data directly via the "+" button in the navigation group. Newly created data menus will be categorized under it.